Tuesday, March 10, 2015

Unity: Plug and Play Conditions and Actions

In this article, I want to briefly describe a fairly simple, flexible, and modular technique that I have been using in my Unity projects to check conditions in games, and perform actions of all kinds. This article assumes you understand the concepts of inheritance and polymorphism.

Say you are making an RPG game, and you want to create an epic weapon with some awesome effect on it. For instance, lets make a weapon called "The Injured Warrior's Sword of Raining Night Coins." This sword will have a 10% chance when you hit an enemy with it to make a coin-raining particle system around you, play a money-falling sound effect, and give your character 30 to 50 gold coins. However, we only want this effect to be able to happen at night time when your character is below 50% health.

Creating this awesome weapon or any weapon like it is fairly easy as long as you have things set up with an action/condition paradigm in mind.

In this article, actions are scripts that inherit from an abstract Action class that contains an abstract function called DoAction(). Similarly, conditions are scripts that inherit from an abstract Condition class that contains an abstract function called CheckCondition().

To accomplish this ambitious goal, create a game object within the sword's hierarchy. On this game object, attach a script that listens for some event on the weapon that fires whenever the weapon hits something. This can be accomplished through C# events for example. When the event occurs, have the script call CheckCondition() on all Condition components attached to the game object. If all of them return true, then have the script call DoAction() on all of the Action components attached to the game object.

Assuming you already had all of the following action and condition scripts written:
  1. Add ChanceCondition script. Set it's chance to 0.1.
  2. Add a TimeOfDayCondition script. Set its range from 6pm to 6am.
  3. Add a PlayerHealthPercentageCondition script. Set its threshold to Less than 50%.
  4. Create a good looking coin-raining particle system prefab.
  5. Add an InstantiatePrefabAction script, and drag in the reference to the particle system prefab.
  6. Add a PlaySoundAction script, and drag in a reference to your desired money falling sound.
  7. Add a GivePlayerRandomMoney script, and set the range from 30 to 50.

It is done! You're awesome sword with all kinds of crazy effects and conditions took little more than dragging in a few select condition and action scripts, and setting their parameters. As you can see, this technique of writing common game condition checks and actions, each in their own small script can be incredibly powerful, and it can be used in all kinds of places throughout your project.


I have started to use this paradigm very heavily in Salt, and it has worked out quite well. For instance, I use conditions for what fish you catch, what loot you receive from killing a pirate, whether or not you can place an object on a boat, if a certain night-time exclusive creature is allowed to spawn, and so forth. I use actions for all kinds of things too, such as effects on weapons, special events that happen when you touch things, stuff that happens during boss fights, etc. 

Every time I need some new thing to happen in the game, I create a new action script that accomplishes what I need. I try to make the new scripts as flexible as I can so that I can re-use the same script later for different things. Same for conditions. Each time I need to check some game state, I create a new condition script.

I have slowly built up a large library of both action and condition scripts over time. With this library, implementing new items, effects, and content in general is very often just plug and play. This allows me to throw together very complicated functionality in very little time.

This kind of system also makes non-coding developers very happy.

Code

Here is the Condition abstract class that I use in Salt.


using UnityEngine;
using System.Collections;
using System;

public abstract class Condition : MonoBehaviour {

 public event Action<bool> conditionCheckedEvent;

 public bool CheckCondition () {
  return CheckCondition(null);
 }

 public bool CheckCondition(System.Object o) {
  bool returnVal = OnCheckCondition(o);
  if (conditionCheckedEvent != null) {
   conditionCheckedEvent(returnVal);
  }
  return returnVal;
 }

 public abstract bool OnCheckCondition (System.Object o);

}

As for actions, I actually use an interface called IAction, and have new action scripts implement that interface. You may choose to make it a class and use inheritance like with the conditions. Either way will work fine. Here is my IAction interface declaration and an example action:

using UnityEngine;
using System.Collections;

public interface IAction {
 bool DoAction(System.Object o);
}

using UnityEngine;
using System.Collections;

public class InstantiatePrefabAction : MonoBehaviour, IAction {

    public GameObject prefab;
    public Transform prefabParent;
    public bool setParentToThis = false;

    public bool DoAction(object o)
    {
        if (prefab == null)
        {
            Debug.LogError(name + " instantiate prefab action requires reference to prefab.", this);
        }
        GameObject newGO = Instantiate(prefab, transform.position, transform.rotation) as GameObject;
        newGO.transform.parent = prefabParent;
        if (newGO.transform.parent == null)
        {
            if (setParentToThis)
            {
                newGO.transform.parent = transform;
            }
        }
        return true;
    }
}

I originally gave the DoAction() function a bool return type because I figured I might sometimes need to know when an action failed, but I have yet to use it for anything. You can give it a void return type if you don't want to be stuck with having to return a bool value for every action you create.

Tuesday, September 17, 2013

Unity 3D - Recycling Bins: An Object Pooling Solution

Object pooling in this article refers to the reuse of game objects that would otherwise be frequently destroyed and re-created. Destroying game objects in Unity leads to quicker memory fragmentation and more work for the garbage collector (see the article by whydoidoit here for more detailed information).

My solution to this was to create two classes: RecycleBin and RecycleBinManager. The RecycleBin class is in charge of keeping up with all of the instances of a certain prefab, and manages their reuse. The RecycleBinManager is responsible for keeping track of the recycling bins, and giving out the reference to the correct one when needed (a single recycling bin instance only deals with objects of a single type of prefab).

To use the sysem, you first request a reference to the correct recycle bin from the RecycleBinManager, then use that reference whenever you would normally instantiate or destroy instances of the associated prefab. In essence, the bin just disables objects that you tell it to remove, and then relocates and re-enables them later, avoiding some of the potential performance problems caused by using Destroy() and Instantiate().

RecycleBin Class

Here is the code for the RecycleBin class:

public class RecycleBin {
	public GameObject prefab;
	Queue<gameobject> _safeToMove = new Queue<gameobject>();
	public Transform folder;
	
	
	public RecycleBin (GameObject prefab) {	
		this.prefab = prefab;
		folder = new GameObject(prefab.name + " Recycling Folder").transform;
	}
	
	public GameObject Add (Vector3 position, Quaternion rotation) {
		GameObject objReference;
		
		// If we don't have any disabled GameObjects that we can reuse, make a new one
		if (_safeToMove.Count == 0) {
			objReference = GameObject.Instantiate(prefab, position, Quaternion.identity) as GameObject;
			objReference.transform.parent = folder;
			objReference.transform.rotation = rotation;
			return objReference;
		}
		
		// If the _safeToMove queue has something in it, relocate and enable it
		else {
			objReference = _safeToMove.Dequeue();
			objReference.transform.position = position;
			objReference.transform.rotation = rotation;
			objReference.SetActive(true);
			return objReference;
		}
	}
	
	public void Remove (GameObject go) {
		_safeToMove.Enqueue(go);
		go.SetActive(false);
	}
	
}


RecycleBin contains two methods:
  • Add (Vector3 position, Quaternion rotation) - Call this function whenever you would normally instantiate an instance of the prefab. It returns a reference to the GameObject that was just placed.
  • Remove (GameObject go) - Call this function whenever you would normally destroy one of the instantiated prefabs. Give it a GameObject reference that was returned by the Add() function to remove that object.
The constructor requires that you specify the prefab that the bin will be responsible for. It also creates an empty GameObject that will be used as a folder. All objects created through the recycling bin will have their parent set as that empty GameObject to keep the hierarchy window tidy.

RecycleBinManager Class

Here is the code for the RecycleBinManger class:
public class RecycleBinManager : MonoBehaviour {
	
	private static List<recyclebin> _objectCollections = new List<recyclebin>();
	private static Transform _recyclingBinFolder = new GameObject("Recycle Bins").transform;
	
	public static RecycleBin GetRecycleBin (GameObject prefab) {
		foreach (RecycleBin objCollection in _objectCollections) {
			if (objCollection.prefab == prefab) {
				return objCollection;	
			}
		}
		// If we didn't find one that matched, it dosn't exist yet, so create a new one.
		RecycleBin newObjectCollection = new RecycleBin(prefab);
		newObjectCollection.folder.parent = _recyclingBinFolder;
		_objectCollections.Add(newObjectCollection);
		return newObjectCollection;
	}
		
}


The manager keeps up with all of the different recycling bins. It's only method is a static function that retrieves or creates the recycling bin for a given prefab. It also creates an empty GameObject that is used as a folder for all of the recycling bin folders to keep the hierarchy in the inspector tidy.

Note that you will need to include
using UnityEngine;
using System.Collections.Generic

Example

Here is a quick example on how to use the recycling bins. Create a c# script called RecyclingTest.cs, and place in it the following code:

using UnityEngine;
using System.Collections;
using System.Collections.Generic;

public class RecyclingTest : MonoBehaviour {
	
	public GameObject prefab;
	private RecycleBin _bin;
	private Queue<gameobject> _gameObjectQueue = new Queue<gameobject>();
	private float _xLoc;

	void Start () {
		_bin = RecycleBinManager.GetRecycleBin(prefab);		
	}

	
	void OnGUI () {
		if (GUI.Button(new Rect(10, 10, 100, 50), "Add Object")) {
			Vector3 newLocation = new Vector3(_xLoc, 0f, 0f) + transform.position;
			_xLoc += 2f;
			GameObject newGameObject = _bin.Add(newLocation, Quaternion.identity);
			_gameObjectQueue.Enqueue(newGameObject);	
		}
		if (GUI.Button(new Rect(10, 100, 100, 50), "Remove Object")) {
			if (_gameObjectQueue.Count &gt; 0) {
				_bin.Remove(_gameObjectQueue.Dequeue());	
			}
		}
		
	}
}

You probably also want to add a directional light so you can see a bit better.

Create a new empty game object, name it Recycle Test, and attach the RecyclingTest script to it. Then add a prefab to the prefab variable on the script in the inspector. Any prefab will do. I created a new one that was just a cube.

Hit the play button. There will be two buttons. When you click the Add Object button, an instance of your prefab will appear. If you don't see the cubes, you may need to re-position the main camera. Hit the button a few more times to make more instances of the prefab. If you look in the hierarchy window, you'll notice a new object there called "Recycling Bin." Expand it and you will find a recycling folder for your prefab. Inside there will be the instances of the prefab.


Leave the hierarchy of the recycling bin expanded and watch what happens when you hit the remove object button. An object will disappear from the game window, and one of the items in the recycling bin folder will be grayed out, meaning that it is now disabled.

Now hit the add button again. Another object will appear in the game window, and one of the items from the hierarchy that was previously grayed out is now enabled again. This is because the recycling bin reused one of the old objects by relocating it to a new position and re-enabling it.

Take a look at the code in RecyclingTest.cs. In the start function, we are getting the recycling bin instance for the prefab, and caching it in the _bin variable. In the OnGUI() function, when the Add Object button is pressed, we first determine the location of the next object, and then make a call to bin.Add(), passing in the position and rotation that we want the new object to have. Also, we keep up with a reference to the game object by placing it in a queue.

When the Remove Object button is pressed, we check to see if there are any objects to remove by checking if the queue has anything in it. If so, we get a reference to an object from the queue, and tell the bin to remove it.

You can follow the same general method outlined in this example to reuse objects of any number of different types of prefabs in your project. If we were to create another instance of RecyclingTest and gave it a different prefab, second RecycleBin would be created to hold those instances, and you would see another folder in the hierarchy.

Conclusion

By reusing old objects when available, but still creating new ones as needed, this solution is both efficient and flexible. Optionally, Instead of letting the bins instantiate new objects as the game goes, a sufficient number of objects can be "pre-loaded" at the start of a scene by adding and then removing them so that most or all future adds are re-uses.

As a real-world example, a project I am working on involves a number of different islands with similar trees (not unity terrain trees). As the player goes from island to island, the same tree objects are re-used using this system.

Full Code for RecycleBinManager.cs

using UnityEngine;
using System.Collections.Generic;

public class RecycleBinManager : MonoBehaviour {
	
	private static List<RecycleBin> _objectCollections = new List<RecycleBin>();
	private static Transform _recyclingBinFolder = new GameObject("Recycle Bins").transform;
	
	public static RecycleBin GetRecycleBin (GameObject prefab) {
		foreach (RecycleBin objCollection in _objectCollections) {
			if (objCollection.prefab == prefab) {
				return objCollection;	
			}
		}
		// If we didn't find one that matched, it dosn't exist yet, so create a new one.
		RecycleBin newObjectCollection = new RecycleBin(prefab);
		newObjectCollection.folder.parent = _recyclingBinFolder;
		_objectCollections.Add(newObjectCollection);
		return newObjectCollection;
	}
		
}

public class RecycleBin {
	public GameObject prefab;
	Queue<GameObject> _safeToMove = new Queue<GameObject>();
	public Transform folder;
	
	
	public RecycleBin (GameObject prefab) {	
		this.prefab = prefab;
		folder = new GameObject(prefab.name + " Recycling Folder").transform;
	}
	
	public GameObject Add (Vector3 position, Quaternion rotation) {
		GameObject objReference;
		
		// If we don't have any disabled GameObjects that we can reuse, make a new one
		if (_safeToMove.Count == 0) {
			objReference = GameObject.Instantiate(prefab, position, Quaternion.identity) as GameObject;
			objReference.transform.parent = folder;
			objReference.transform.rotation = rotation;
			return objReference;
		}
		
		// If the _safeToMove queue has something in it, relocate and enable it
		else {
			objReference = _safeToMove.Dequeue();
			objReference.transform.position = position;
			objReference.transform.rotation = rotation;
			objReference.SetActive(true);
			return objReference;
		}
	}
	
	public void Remove (GameObject go) {
		_safeToMove.Enqueue(go);
		go.SetActive(false);
	}
	
}

Thursday, September 12, 2013

Unity3D - Modify Textures Procedurally

Procedurally created textures are very useful tools within Unity. Not only can they be used to create textures that the players will see, but they are also helpful when you need to visualize the results of some algorithms.

I'll get you started by showing you an example. Our goal is to write a function to visualize how texture coordinates are organized on a Unity plane object.

private void SetTexture (int width, int height) {
 Texture2D texture = new Texture2D(width, height);
 Color[] pix = new Color[texture.width * texture.height];
 renderer.material.mainTexture = texture;
 
 
 for (int y = 0; y < texture.height; y++) {
  for (int x = 0; x < texture.width; x++) {
   pix[y*texture.width + x] = new Color((float)x/texture.width,0f,(float)y/texture.height);
  }
 }
 
 texture.SetPixels(pix);
 texture.Apply();
}
This function first creates a new Texture2D and an array of Color objects that will hold the color values for the pixels in our new texture. Then it sets the main texture of the renderer to our newly created Texture2D object.

The for loops iterate through each pixel in the texture. Take note of how the correct pixel index is referenced in the pix array. Since we are using a 1-dimensional array to represent a 2-dimensional array of data, we have to do something a little special here. In the pix array, all the color values for the first row of pixels will be stored in indices 0 through n-1 where n is the the width of the texture (stored in texture.width in our case). The second row of pixels will be stored in indices n through 2n-1. This pattern continues throughout however many rows of pixels there are. Therefore, we can find the index to the pixel located at (x,y) by multiplying y by the width of the texture and then adding x.

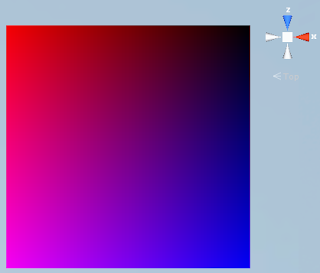
We want to color each pixel in such a way that we can get the information we want just by looking at it. In this example, we set the red value of each pixel to be x/texture.width, the green value to 0, and the blue value to be y/texture.height. This will mean that pixels at higher x values will be more red, and pixels at higher y values will be more blue.

After setting the color of all the pixels, we have to set the pix array as the array of pixels that our texture uses. We do this with texture.SetPixels(pix). Lastly we must call texture.Apply().

Applying this algorithm to a plane in unity gives us this result:


For the pixel at (0,0), all three of the red/green/blue values of the color should be 0, giving us black. Looking at our plane, we can now deduce that this particular pixel is in the top right corner. Note that the way I have the plane oriented in the picture, its local axes line up with the global axes. We can also deduce that the last pixel is located at the bottom left since at that location, both red and blue are at maximum, giving us purple.

By changing the texture on the plane procedurally, we are able to learn that on the primitive unity plane, the x coordinate of the texture goes from the positive x direction to the negative x direction, and the y coordinate goes from the positive z direction to the negative z direction.

This technique can be used in many different applications to help you to quickly visualize something that might otherwise be more difficult. For example, I have used it to visualize the distribution of randomly generated islands in an ocean.