I'll get you started by showing you an example. Our goal is to write a function to visualize how texture coordinates are organized on a Unity plane object.
The for loops iterate through each pixel in the texture. Take note of how the correct pixel index is referenced in the pix array. Since we are using a 1-dimensional array to represent a 2-dimensional array of data, we have to do something a little special here. In the pix array, all the color values for the first row of pixels will be stored in indices 0 through n-1 where n is the the width of the texture (stored in texture.width in our case). The second row of pixels will be stored in indices n through 2n-1. This pattern continues throughout however many rows of pixels there are. Therefore, we can find the index to the pixel located at (x,y) by multiplying y by the width of the texture and then adding x.
We want to color each pixel in such a way that we can get the information we want just by looking at it. In this example, we set the red value of each pixel to be x/texture.width, the green value to 0, and the blue value to be y/texture.height. This will mean that pixels at higher x values will be more red, and pixels at higher y values will be more blue.
After setting the color of all the pixels, we have to set the pix array as the array of pixels that our texture uses. We do this with texture.SetPixels(pix). Lastly we must call texture.Apply().
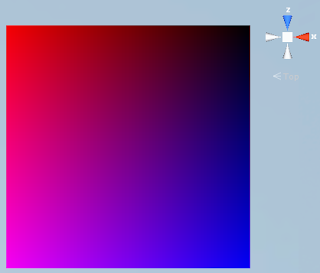
Applying this algorithm to a plane in unity gives us this result:
For the pixel at (0,0), all three of the red/green/blue values of the color should be 0, giving us black. Looking at our plane, we can now deduce that this particular pixel is in the top right corner. Note that the way I have the plane oriented in the picture, its local axes line up with the global axes. We can also deduce that the last pixel is located at the bottom left since at that location, both red and blue are at maximum, giving us purple.
By changing the texture on the plane procedurally, we are able to learn that on the primitive unity plane, the x coordinate of the texture goes from the positive x direction to the negative x direction, and the y coordinate goes from the positive z direction to the negative z direction.
This technique can be used in many different applications to help you to quickly visualize something that might otherwise be more difficult. For example, I have used it to visualize the distribution of randomly generated islands in an ocean.
private void SetTexture (int width, int height) {
 Texture2D texture = new Texture2D(width, height);
 Color[] pix = new Color[texture.width * texture.height];
 renderer.material.mainTexture = texture;


 for (int y = 0; y < texture.height; y++) {
  for (int x = 0; x < texture.width; x++) {
   pix[y*texture.width + x] = new Color((float)x/texture.width,0f,(float)y/texture.height);
  }
 }

 texture.SetPixels(pix);
 texture.Apply();
}
This function first creates a new Texture2D and an array of Color objects that will hold the color values for the pixels in our new texture. Then it sets the main texture of the renderer to our newly created Texture2D object.The for loops iterate through each pixel in the texture. Take note of how the correct pixel index is referenced in the pix array. Since we are using a 1-dimensional array to represent a 2-dimensional array of data, we have to do something a little special here. In the pix array, all the color values for the first row of pixels will be stored in indices 0 through n-1 where n is the the width of the texture (stored in texture.width in our case). The second row of pixels will be stored in indices n through 2n-1. This pattern continues throughout however many rows of pixels there are. Therefore, we can find the index to the pixel located at (x,y) by multiplying y by the width of the texture and then adding x.
We want to color each pixel in such a way that we can get the information we want just by looking at it. In this example, we set the red value of each pixel to be x/texture.width, the green value to 0, and the blue value to be y/texture.height. This will mean that pixels at higher x values will be more red, and pixels at higher y values will be more blue.
After setting the color of all the pixels, we have to set the pix array as the array of pixels that our texture uses. We do this with texture.SetPixels(pix). Lastly we must call texture.Apply().
Applying this algorithm to a plane in unity gives us this result:
For the pixel at (0,0), all three of the red/green/blue values of the color should be 0, giving us black. Looking at our plane, we can now deduce that this particular pixel is in the top right corner. Note that the way I have the plane oriented in the picture, its local axes line up with the global axes. We can also deduce that the last pixel is located at the bottom left since at that location, both red and blue are at maximum, giving us purple.
By changing the texture on the plane procedurally, we are able to learn that on the primitive unity plane, the x coordinate of the texture goes from the positive x direction to the negative x direction, and the y coordinate goes from the positive z direction to the negative z direction.
This technique can be used in many different applications to help you to quickly visualize something that might otherwise be more difficult. For example, I have used it to visualize the distribution of randomly generated islands in an ocean.

No comments:
Post a Comment